Content Menu
● Identifying Common Problems
● Essential Tools and Materials
● Step-by-Step Repair Techniques
>> Fixing Scuffed Leather
>> Repairing Worn Soles
>> Mending Loose Stitching
>> Restoring Cracked Leather
>> Replacing Damaged Heels
>> Addressing Elastic Gusset Issues
>> Resolving Fitting Problems
● Maintenance Tips for Longevity
● Professional Repair Services
● Conclusion
● FAQ
>> 1. How much does it cost to resole boots?
>> 2. Can all types of boots be resoled?
>> 3. How do I clean leather boots?
>> 4. How often should I condition my leather boots?
>> 5. What can I do about shin bang in ski boots?
● Citations:
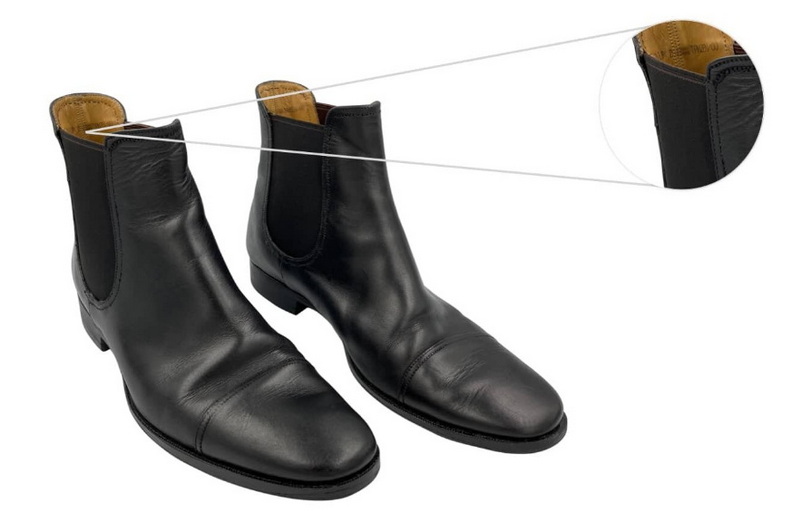
Chelsea boots, with their sleek design and ease of wear, have become a staple in wardrobes worldwide. Their versatility allows them to be dressed up or down, making them suitable for various occasions. However, like all footwear, Chelsea boots are subject to wear and tear. Knowing how to fix common issues can significantly extend their lifespan and maintain their appearance[2]. This article provides a comprehensive guide to repairing and maintaining Chelsea boots, ensuring they remain a stylish and functional part of your wardrobe for years to come.

Identifying Common Problems
Before diving into the repair process, it's essential to identify the common problems that affect Chelsea boots. These can range from minor scuffs to more significant structural issues.
- Scuffed Leather: This is perhaps the most common issue, arising from everyday wear and accidental scrapes[2][6].
- Worn Soles: The soles of Chelsea boots endure constant friction and pressure, leading to wear and potential detachment[2][12].
- Loose Stitching: The seams holding the boot together can weaken over time, causing the stitching to come undone[12].
- Cracked Leather: Leather can dry out and crack, especially if not properly conditioned[6][7].
- Heel Damage: The heels can wear unevenly or break off entirely[12].
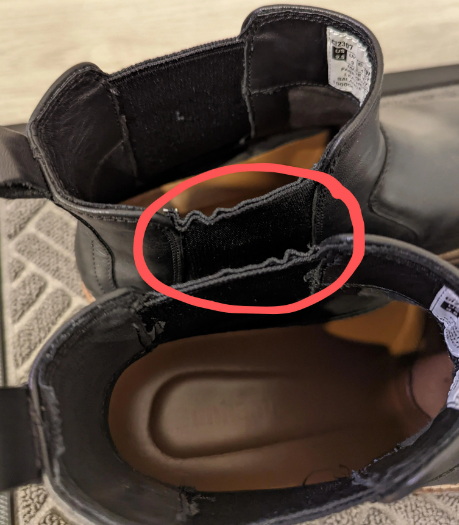
- Elastic Gusset Issues: The elastic side panels can lose their elasticity, become frayed, or detach[5][10].
- Fitting Problems: Boots may be too tight, too loose, or cause discomfort due to improper fit[1].
Essential Tools and Materials
Having the right tools and materials is crucial for effective boot repair. Here's a list of essentials:
- Leather Cleaner: To remove dirt and grime[7].
- Leather Conditioner: To moisturize and prevent cracking[2][7].
- Leather Dye or Polish: To restore color and cover scuffs[2][7].
- Shoe Glue: A strong adhesive for reattaching soles and seams[2].
- Needle and Thread: For stitching repairs[2][7].
- Sandpaper: Fine-grit sandpaper to smooth rough areas[6][8].
- Leather Filler: To fill deep scratches and cracks[7][8].
- Shoe Trees: To maintain shape and absorb moisture[2][11].
- Rubber Bands or Clamps: To hold pieces together while glue dries[2][6].
- Pliers: For removing old soles or nails[2].
- Shoe Stretching Spray: To stretch tight areas[2].
- Elastic Gusset Replacement Kit: If replacing the elastic panels[5][10].
- Soft Cloths and Brushes: For cleaning and applying products[6][7].
Step-by-Step Repair Techniques
The following sections detail specific repair techniques for common Chelsea boot problems.
Fixing Scuffed Leather
Scuffs can often be repaired with simple techniques.
1. Clean the Area: Use a damp cloth to wipe away any dirt or debris from the scuffed area[2].
2. Apply Leather Conditioner: This helps to soften the leather and reduce the appearance of scuffs[2][7].
3. Use Leather Dye or Polish: Match the dye or polish to the boot's color and apply it with a soft cloth in a circular motion[2][7].
4. Buff the Area: Once the dye is dry, buff the area with a clean cloth to blend the repair with the rest of the boot[6].
Repairing Worn Soles
Worn soles can compromise the integrity and comfort of your boots.
1. Remove the Old Sole: Use pliers to carefully detach the old sole. Be gentle to avoid damaging the upper part of the boot[2].
2. Clean the Shoe Base: Remove any residual glue or debris from the base of the boot[2][6].
3. Prepare the New Sole: If necessary, cut the new sole to the correct size and shape[2].
4. Apply Shoe Glue: Spread an even layer of shoe glue on both the shoe base and the new sole[2].
5. Attach the New Sole: Press the new sole firmly onto the base and use clamps or rubber bands to hold it in place while the glue dries[6].
6. Finish: Trim any excess sole material and sand the edges for a smooth finish[2].
Mending Loose Stitching
Loose stitching can lead to further damage if not addressed promptly.
1. Clean the Area: Remove any dirt or loose threads from the area around the loose stitching[2].
2. Thread the Needle: Use a strong needle and thread that matches the original stitching[7].
3. Sew the Seam: Carefully sew the seam, following the original stitch pattern. Ensure the stitches are tight and secure[2][7].
4. Reinforce with Glue: Apply a small amount of shoe glue over the seam for extra durability[2].
Restoring Cracked Leather
Cracked leather requires careful attention to restore its flexibility and appearance.
1. Clean the Boots: Use a mild soap and a soft cloth to clean the boots, removing any dirt and grime[6].
2. Apply Leather Conditioner: Apply a generous amount of leather conditioner to the cracked areas, using the back of a spoon to smooth down the cracks[6][7].
3. Let it Soak: Allow the conditioner to soak in overnight. Repeat the process if the cracks are still visible[6].
4. Apply Leather Filler (for Deep Cracks): For deep cracks, apply leather filler to the cracks and let it dry. Sand the area gently to create a smooth surface[7][8].
5. Dye and Polish: Apply leather dye or polish to restore the color and finish[7].
Replacing Damaged Heels
Replacing damaged heels ensures stability and prolongs the life of your boots.
1. Remove the Old Heel: Use pliers or a screwdriver to remove the old heel. Be careful not to damage the boot's upper[2].
2. Prepare the New Heel: Ensure the new heel fits properly. You may need to trim it to the correct size[2].
3. Attach the New Heel: Use nails or screws to secure the new heel in place[2].
4. Finish: Sand the edges of the heel and apply polish if needed to match the rest of the boot[2].

Addressing Elastic Gusset Issues
The elastic gussets are crucial for the fit and comfort of Chelsea boots.
1. Remove the Old Gussets: Use a seam ripper or small scissors to carefully remove the old elastic gussets[5][10].
2. Prepare the New Gussets: Cut new elastic gussets to the correct size and shape. Consider using double-layered elastic for durability and a better appearance[10].
3. Attach the New Gussets: Glue and stitch the new gussets in place, ensuring they are securely attached to the boot lining and upper[5][10].
4. Ensure Proper Tension: Make sure the elastic is properly tensioned to provide a snug but comfortable fit[10].
Resolving Fitting Problems
Improper fit can cause discomfort and damage to your feet and boots.
1. Stretching Tight Boots: Use a shoe stretching spray and shoe stretchers to gradually widen tight boots[2].
2. Adding Insoles: If the boots are too loose, add insoles to take up extra space and provide better support[1].
3. Using Tongue Pads: For Chelsea boots that are too loose around the instep, use tongue pads to fill the extra space[3].
Maintenance Tips for Longevity
Preventative care is essential for extending the life of your Chelsea boots.
- Regular Cleaning: Keep your boots clean to prevent damage from dirt and moisture[2][7]. Use a soft brush and a damp cloth to wipe away dirt and grime[12].
- Conditioning Leather: Regularly apply leather conditioner to keep the material soft and supple[2][7].
- Using Shoe Trees: Insert shoe trees when you're not wearing your boots to maintain their shape and absorb moisture[2][11].
- Rotating Shoes: Avoid wearing the same pair of boots every day to give them time to air out and recover[2].
- Waterproofing: Apply a waterproofing wax or spray to protect your boots from water damage[2].
Professional Repair Services
While many repairs can be done at home, some issues are best left to professional cobblers[12]. These include:
- Complex Stitching Repairs: Intricate stitching patterns or repairs in hard-to-reach areas.
- Full Sole Replacement: Replacing the entire sole of the boot.
- Structural Damage: Significant damage to the boot's frame or construction.
Conclusion
Repairing Chelsea boots is a worthwhile endeavor that can save money and extend the life of your favorite footwear. By identifying common problems, gathering the necessary tools, and following the step-by-step techniques outlined in this article, you can address many issues at home. Regular maintenance and preventative care will further ensure your Chelsea boots remain in excellent condition for years to come. When faced with complex or extensive damage, seeking the expertise of a professional cobbler is always a wise decision.

FAQ
1. How much does it cost to resole boots?
The cost to resole boots can vary depending on the cobbler and the type of sole. DIY resoling can save money, but professional services typically range from $80 to $150[6].
2. Can all types of boots be resoled?
Most leather boots can be resoled, but the feasibility depends on the boot's construction. Boots with cemented soles are more difficult to resole than those with stitched soles[12].
3. How do I clean leather boots?
Use a soft brush to remove loose dirt, then wipe the boots with a damp cloth. For tougher stains, use a mild leather cleaner[6][7][12].
4. How often should I condition my leather boots?
Condition your leather boots every 1-3 months, or more frequently if they are exposed to harsh conditions[2][7].
5. What can I do about shin bang in ski boots?
Shin bang, or bruising of the shin, is often caused by boots that are too big or stiff. Solutions include using a properly fitting insole, changing the profile of your foot with a shim, or using an aftermarket liner for more padding[1].
Citations:
[1] https://skimo.co/solve-ski-bootfitting-problems
[2] https://www.coblrshop.com/post/the-ultimate-guide-to-shoe-repair-tips-techniques-from-expert-cobblers
[3] https://www.youtube.com/watch?v=SOcwD5_2k1U
[4] https://www.youtube.com/watch?v=HPfohT5HeJ0
[5] https://www.youtube.com/watch?v=aDbDXAdwdg8
[6] https://www.timberland.com/en-us/faq/how-to-repair-leather-boots
[7] https://nicksboots.com/blog/post/leather-boot-repair/
[8] https://leatherhero.com.au/pages/how-to-restore-scuffed-chelsea-boots
[9] https://www.istockphoto.com/photos/shoe-repair
[10] https://www.youtube.com/watch?v=jJcs2Z-ytUI
[11] https://www.youtube.com/watch?v=iYFhECl-xNM
[12] https://nushoe.com/boot-repair-resole/
[13] https://www.youtube.com/watch?v=XsL38NXWnws
[14] https://www.youtube.com/watch?v=HPfohT5HeJ0
[15] https://www.pavers.co.uk/blogs/how-should-chelsea-boots-fit
[16] https://www.reddit.com/r/AskACobbler/comments/1hzrxhb/chelsea_boot_repair/
[17] https://shoerepairer.info/topic/21762-heel-lining-in-chelsea-boots/
[18] https://chelseabootstore.com/how-to-break-in-your-chelsea-boots/
[19] https://www.youtube.com/watch?v=JJYThgqdXWg
[20] https://www.tiktok.com/discover/how-to-repair-boot-loop-chelsea-boots
[21] https://www.youtube.com/watch?v=R37v_lIYFO0
[22] https://www.rmwilliams.com.au/footwear/men/boot-repair-service?lang=default
[23] https://www.reddit.com/r/malefashionadvice/comments/3rdacs/i_like_chelsea_boots_but_im_struggling_a_bit_with/
[24] https://www.vagabond.com/en/about-us/the-care/
[25] https://www.airr.com.au/2023/11/10/how-to-break-in-chelsea-boots/
[26] https://www.shutterstock.com/search/repair-boots
[27] https://www.instagram.com/lifemadelight/p/B4I1EBjHrgq/
[28] https://www.youtube.com/watch?v=CxU_qom_j-4
[29] https://www.youtube.com/watch?v=mpzCUJK6DRo
[30] https://www.facebook.com/JDshoerepair/posts/chelsea-boot-with-fresh-elastic-panels-heels-and-a-shine-like-elastic-remember-t/10157872188849727/
[31] https://www.shutterstock.com/search/boot-repair
[32] https://www.tiktok.com/@danthecobbler/video/7341429863041027361
[33] https://www.istockphoto.com/photos/shoe-repair-glue
[34] https://www.youtube.com/watch?v=ybri_Aka5g4
[35] https://stock.adobe.com/search?k=shoe+repair
[36] https://www.tiktok.com/discover/shoe-repair-chelsea-boots
[37] https://nushoe.com/the-ultimate-shoe-repair-guide-tips-tricks-and-techniques/


